Thursday, June 23, 2011

How to Install Google Analytics?


The benefit of installing Google Analytics is that one can view the data generated about the visitors who are viewing your site.The basic mechanism includes copying a segment of JavaScript code from the Google Analytics site to the pages that you need to be tracked.
Let’s begin the process;
  1. Click the “Access Analytics” button on the home page to create a new account or login to open an existing account.


  1. Now sign in with your username and password.


  1. For security reasons you will be asked to sign up once more.


  1. Once logged in,enter the URL of the site you wish to track,give an account name,and choose country and time zone.
      

  1. Accept the User Agreement and Data Settings clause.The default is set to allow Google to use the data for comparison purposes to perform benchmarking as part of analytics. Then select the “Create New Account” button.


  1. Now copy the JavaScript code which needs to be placed on individual pages of your website.Make sure to select the ‘ga.js” version from the two options and then click “Continue”.


  1. On this page, you will notice that the tracking status is not yet verified.


  1. Open Dreamweaver to install the code.


  1. Paste the code on the pages that require tracking.Insert the tracking code from Google Analytics on the pages just before the tag.


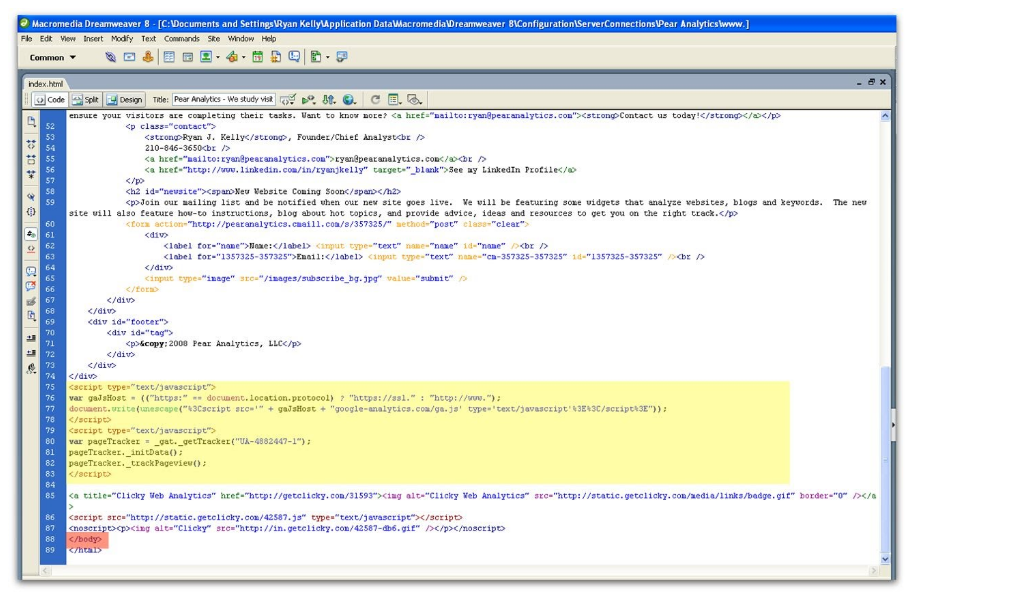
Now save the page and with this the process is completed. Your Google Analytics account starts collecting the details about the visits to your site, number of visitors, keywords which drive the website, exit page, time on site and more.

Tuesday, June 21, 2011

How to Grant Access to Other Users in Google Analytics Account

One of the highlights of Google Analytics is that it allows you to permit access to other users to view the reports of the website that is a part of your Google Analytics account. To do this, you will have to add the other user as a user with your account and that allows the other user to view the Analytics report of the site by logging into his/her user account. You can grant different levels of access to your generated reports. By doing this, the secondary user cannot make changes to the settings of the account.

The steps to grant account access to secondary users are as follows.

1. Login to your Analytics account

2. Look for list of the Google Analytics accounts on the dashboard

3. Click on the link of the Analytics account that you want other users to access and then you would be redirected to a new page

4. On the new page,you can view the different websites of that account in a table  form

5. Just below that particular table,you will find a link “User Manager” which needs to be clicked and you will be taken to screen as follows;


6. Now, click on the “User Manager” link, a new page called “User Manager” will open and a table with a link named “Add User” appears on the page

7. Click the link named “Add User” and you will be redirected to a new page “Create New User for Access”. Now you will need to enter the email address of the person to whom you wish to grant access to your Analytic account. It looks as follows;

8. After entering the email address, you can specify the level of access either “View Reports Only” or “Account Administrator”. Select the option which suits the occasion

9. Another table which contains the list of websites in your account is found on the same page. Now, select the website to which you want to provide access to

10. After selecting the website, click on the “Save Changes” button to complete the process.

Now, the person to whom you have granted account access can login to view the data within the given access level.